FPS
One of the issues I had in the early stages was a sudden drop of frames per second. I wasn’t able to track down the reason for this huge frame drop. At first I was suspecting the use of so tiny modules to recreate the false ceiling, which was the reason for this problem I was facing. (Each module size was one false ceiling tile). After lot of research on google and going through epic documentations and forums and various blogs I was able to track down the problem.
By default, when you import a mesh into you scene its mobility is set to Static, thus, using backed lighting and fast rendering. But when you import a mesh into a blueprint UE4 sets its mobility by default to Movable, meaning it’s totally dynamic and it casts dynamic shadows which of course causes slower render because the calculations are being made in real-time.
Lightmap Density
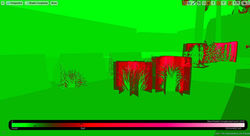
Another thing I had to check and optimize is the lightmap size of each in my scenes and in the modules I am using. Unreal Engine 4 provides us with many view modes and has a tab for optimization called optimization viewmodes.
Nested underneath it you could find the lightmap density view mode. In this mode each object in the scene would be displayed as its name reveals its lightmap density. Color coding the value to the ideal density: Blue being less than ideal texel density, green being ideal and red being greater than the ideal texel density.
The next step would be easy, each mesh with red texel density I decrease the size of its lightmap till the texel density is near ideal values. As for blue meshes I increase the lightmap size to ideal texel density. Also taking into consideration the importance of the element and how affordable is it to increase certain meshes lighmap size.
 |  |  |  |  |
|---|---|---|---|---|
 |
1
Statistics Tool
Another tool I used for optimization is the statistics tool. Found under the window tab the statistics tool is a very useful one.
Primitive stats can give you the number of triangles of each mesh in your scene and its size.
Static Mesh Lighting Info would show you the lightmap size of all the elements in your scene offering an additional optimization tool to the visual lightmap density view mode.
And the third one is Texture Stats where you can check the texture resolution and memory allocation of each mesh in your scene.
Each could be helpful giving you more insights about your scene and somethings flagging and revealing a mistake you made causing slower render time, light build or low fps.
Shader Complexity
The Shader complexity view mode is used to picture the number of shader instructions being used to calculate each pixel of your scene. It helps to optimize and show an overall performance for the scene, also helps reveal the amount of overdraw and the cost of the shader calculation on your meshes.
This mode is also color coded and uses similarly to the lighmap density mode a color spectrum to indicate how expensive the scene is. Green through red represent a linear relationship of "very inexpensive" to "expensive", while pink and white indicate a large jump to "very expensive" pixels
 |  |  |
|---|
Exterior Lighting
Working on my lighting with my reference in head. I started with attaching the sky sphere to the directional light. And fiddling around the various values and parameters of the directional light and the sky sphere; light intensity, light color, cloud opacity and cloud speed to get the feel requested.
8 9 10
Interior Lighting
The interior lighting was a real issue. It was difficult to go darker and dimmer. Especially in the corridor where no light source from the exterior can penetrate.
I had many tests and many changes in the interior setup but in the end I kept it a bit brighter, having the skylight and the directional light lighting part of the shop and used point light as ambient light to support the directional light. If I had more time, I would go deeper into mimicking that interior dimmer light ambiance in the Last of Us.
Post Process
I added a post process volume applied the vignette image effect to the lens. I also felt the need to add a black clip from the tonemapper and bit of bloom.
Exponential Height Fog
Having this large landscape in the far background and the sort of valley in between the two hills; the first where the petrol station resides and the second one facing it with buildings on top. I had to block off the view in the far background. So the best solution was to apply exponential fog. I worked around its density color, falloff, opacity and cutoff distance till I reached the effect desired.
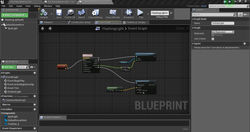
Entrance Door Blueprint
I worked on the Entrance Door animation using a box trigger to trigger the animation to start, setting it to be triggered from both sides and to reverse to initial state when the player exits the trigger box. I had to use the sequence to make each door launch its animation on trigger enter.
I also was trying to make a light bleep and change its color on trigger, similarly to the real sliding door sensors. After doing some research, I was able to change the color when the player enters the trigger box but I couldn’t find a way to reverse it back to its original state on exit. Again, I had to make a choice by not giving it more time since more important tasks had to be done.
11
 |  |  |  |  |
|---|
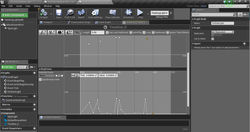
Flickering Light Blueprint
I wanted to add some life to the inside of café Bonjour. Since some of the false ceiling tiles were damaged, I wanted to add a flickering spot light.
With the help of documentation and a couple of other forums, I found many tutorials to do so.
I created a flickering light that also emitted sparkles simultaneously to the flickering, manipulating the brightness intensity and spawning particles. I stetted the animation to be on the loop.
I also did the same for slowly flickering light with no sparks and another flickering light but triggered by box collision.
12
13
 |  |  |  |  |
|---|---|---|---|---|
 |
References
[8] Lights for Visual Artists : Understanding & Using Light in Art & Design, Richard Yot
[9] Lighting in UE available on https://www.youtube.com/watch?v=sPNRYNWclLI
[10] Lighting tutorial Unreal Engine 4 avalaible on https://www.youtube.com/watch?v=SglzBKWN_MI
[11] Unreal Engine : Dynamic Material Instances available on https://www.youtube.com/watch?v=i2XmTbfIJ3s
[12] Unreal Engine documentation Flickering Light available on https://docs.unrealengine.com/latest/INT/Engine/Blueprints/UserGuide/Timelines/Examples/LightFlickering/
[13] UE Flickering light available on https://www.youtube.com/watch?v=WgKky9y9vzg&list=PLzV6_6F25KSBfGQSpSseLBCMnJQaVryer